
How to Purchase DreamHost Hosting with Affiliate Benefits
Do you want to start a website? You need hosting first. Hosting is like a home for your website on the internet. Without it, nobody can see your site.
DreamHost is one of the best and cheapest hosting companies. It works great for beginners and for people who run many websites too. In this guide, we show you each step on how to purchase dreamhost hosting. We show you every click, every field, and every choice you need to make. By the end, your hosting will be live and ready to use.
👉 Let's start.
How to Purchase DreamHost Hosting
Getting DreamHost hosting is quick and simple. Follow these easy steps to choose the right plan and complete your purchase. You can set up your hosting in just a few minutes.
Once done, you can start building your website right away.
Step 1: Clear your Browser Cookies
Cookies are small files your browser saves when you visit a website. If you have already visited the DreamHost, your browser may have saved the old cookies. These old cookies can cause problems during signup.
So before you start, open your browser settings and clear cookies for dreamhost.com. This takes only a few seconds.
Note: If you aren't sure how to do this? Don't worry. We will link a full step-by-step guide for clearing cookies soon.
Step 2: Open Affiliate Link
Now click on affiliate link to open DreamHost: DreamHost Affiliate Link
This link takes you straight to the hosting plans page. Always use this link. It makes sure you get the correct pricing and any active discount.
Step 3: Select Your Hosting Plan
On this page, you make two simple choices.
1. Select Number of Years (length)
Select for how many years, do you want to purchase this hosting?
- A longer plan means a lower price per month.
- A shorter plan means less money upfront.
- Not sure yet? WhatsApp us for a better decision.
📲 WhatsApp here: +92 343 786 1234
2. Choose a Plan Type
Pick the plan that matches your needs.
- Web Hosting Launch: Best for beginners and small websites. Cheapest option.
- DreamPress 1: Best if your site runs on WordPress and you want faster speed and built-in WordPress tools. Not recommended for newbies.
- VPS Business: Best for bigger sites, higher traffic, or if you need more power and control. Only recommended for experts.
Not sure which one? Start with Web Hosting Launch. You can upgrade anytime later as your site grows.
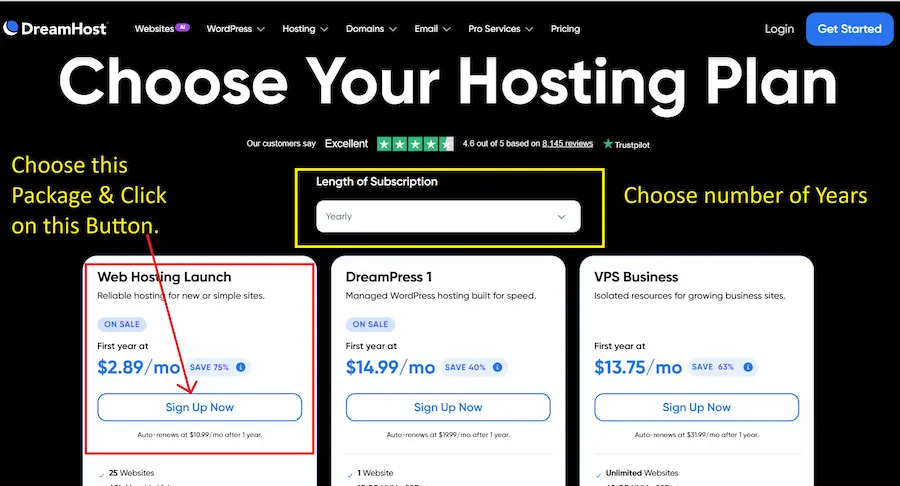
Once you pick your years and your plan, click the "Sign Up Now" button. This takes you to the next screen.
Step 4: Confirm Your Hosting Plan
On this screen, DreamHost will show your selected plan and years. You can still change it here if you want more storage and features. Take a moment to check basic information below:
Quick Comparison of all three plans:
|
Sr |
Features |
Launch |
Growth |
Scale |
|
1 |
Max Number of Websites |
25 |
50 |
100 |
|
2 |
Server Storage [NVMe SSD] |
25 GB |
50 GB |
100 GB |
|
3 |
Server Bandwidth |
Unmetered |
Unmetered |
Unmetered |
|
4 |
Est. Monthly Traffic |
40,000 |
200,000 |
400,000 |
|
5 |
Free Domain |
1 Year |
1 Year |
1 Year |
|
6 |
Est. 1 Year Price |
$34 |
$47 |
$119 |
|
7 |
Est. 2 Years Price |
$59 |
$86 |
$215 |
|
8 |
Est. 4 Years Price |
$95 |
$167 |
$383 |
⇒ Now you can select your required plan according to your need. Follow the below image:
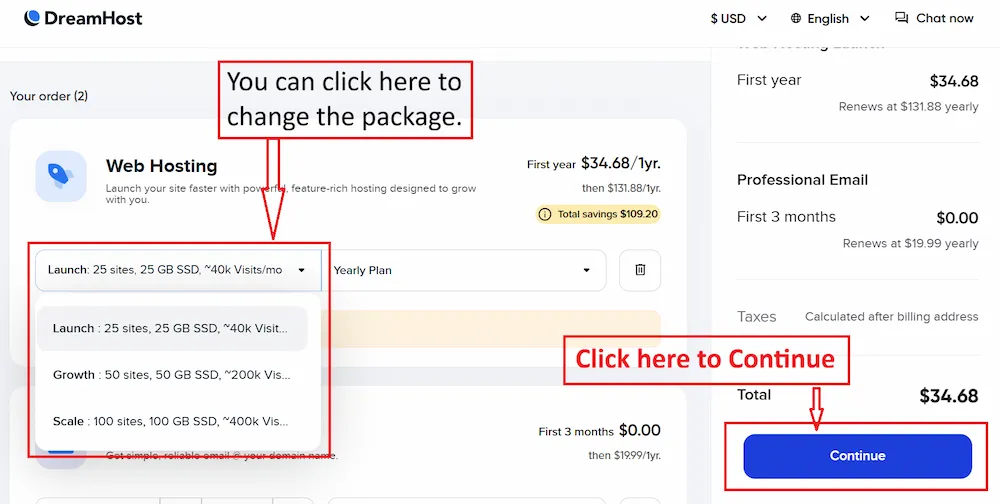
⇒ When you're happy with your choice, click "Continue".
Still you are confused about plan selection? You may contact us for a quick help.
📲 WhatsApp here: +92 343 786 1234
Step 5: Create your Account
Now it's time to make your DreamHost account. Fill in your name, email, and password.
Most Important: Your email must be new.
This means you should not have used this email on DreamHost before. If you use an old email, the system may show an error and your sale will not be counted as an affiliate sale.
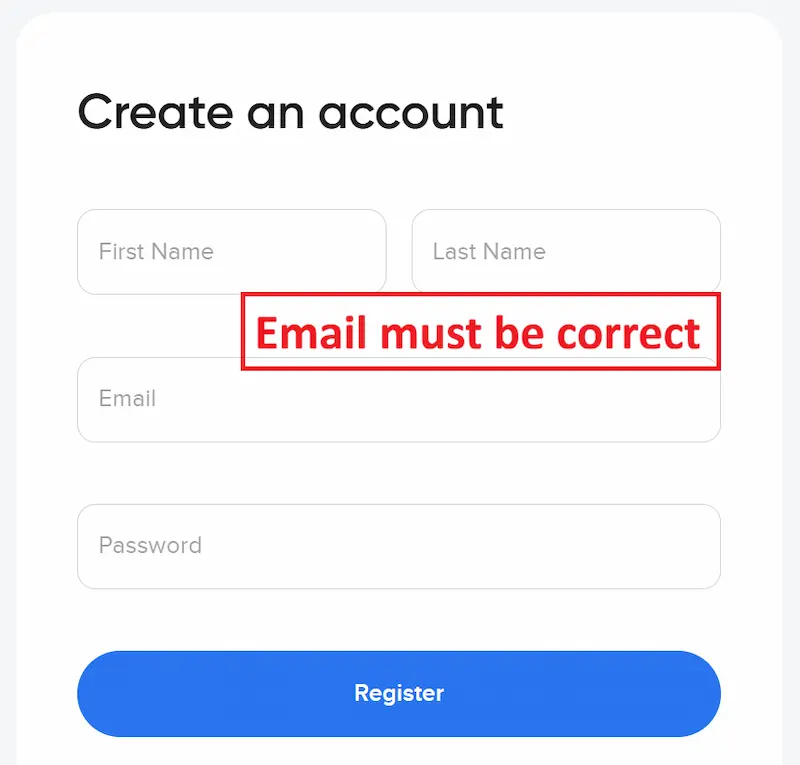
⇒ Now you can click on the “Register” button as shown in the above image.
Step 6: Enter Your Account Information
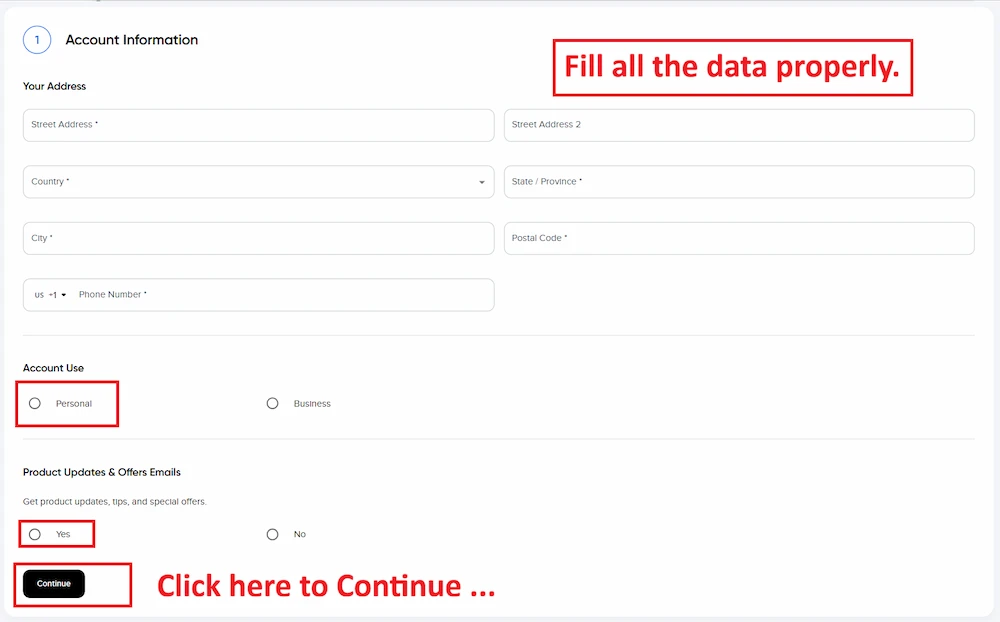
Next, DreamHost asks for more details about you and how you plan to use your account.
- Account Information: Enter all the required fields.
- Account Use: Choose "Personal" if this is for your own website. Choose "Business" if it's for a company.
- Product Updates: Choose "Yes." This lets DreamHost send you helpful emails about new features and updates. You can always turn this off later.
Now click on the “Continue” button as shown in below image:
⇒ Now move to the next step:
Step 7: Choose your Server Location
This step is important. DreamHost asks you to pick a data center location. This is the physical place where your website files will be stored.
Here's the trick: pick the location closest to where most of your visitors live. If your audience is in Asia, a location like Singapore works well. If your audience is in the US, pick a US location instead. A closer location means your website loads faster for your visitors.
For example, if you are in Pakistan and most of your visitors are also nearby, Singapore is a smart pick.
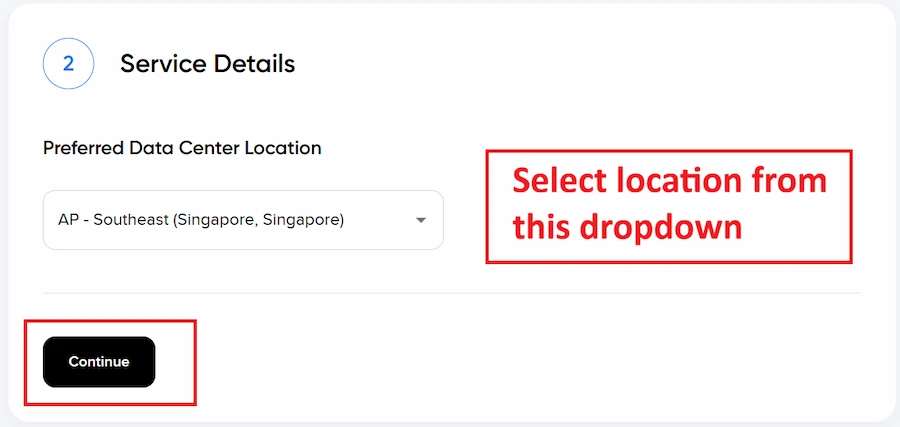
⇒ Once you choose, click "Continue".
Step 8: Enter Your Payment Details
Now you will select your payment method first. You can pay through credit card and PayPal.
⇒ Click on Creditcard if you do not have PayPal:
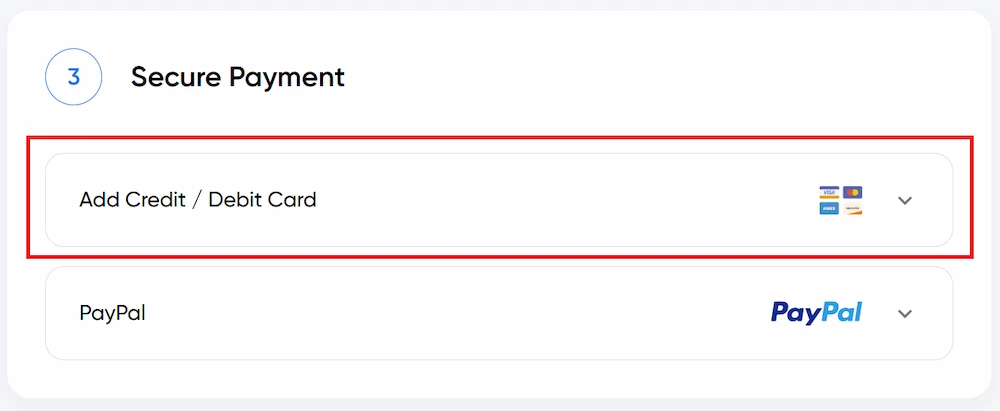
⇒ Now you will enter your complete payment details as shown in below image.
Fill all the fields carefully:
- Name on Card: This is the name written on your bank card.
- Credit Card Number: This is a 16 digit number, written on your bank card.
- Expiry Date: Select Expiry month & Year, that is written on your bank card.
- CVC Number: This is a 3 digit code, written on your bank card.
- Billing Information: Enter your basic billing information.
- Captcha / Security Code: This is the captcha code as shown in the image below.
Check every field carefully before you submit. One wrong digit can cause an error.
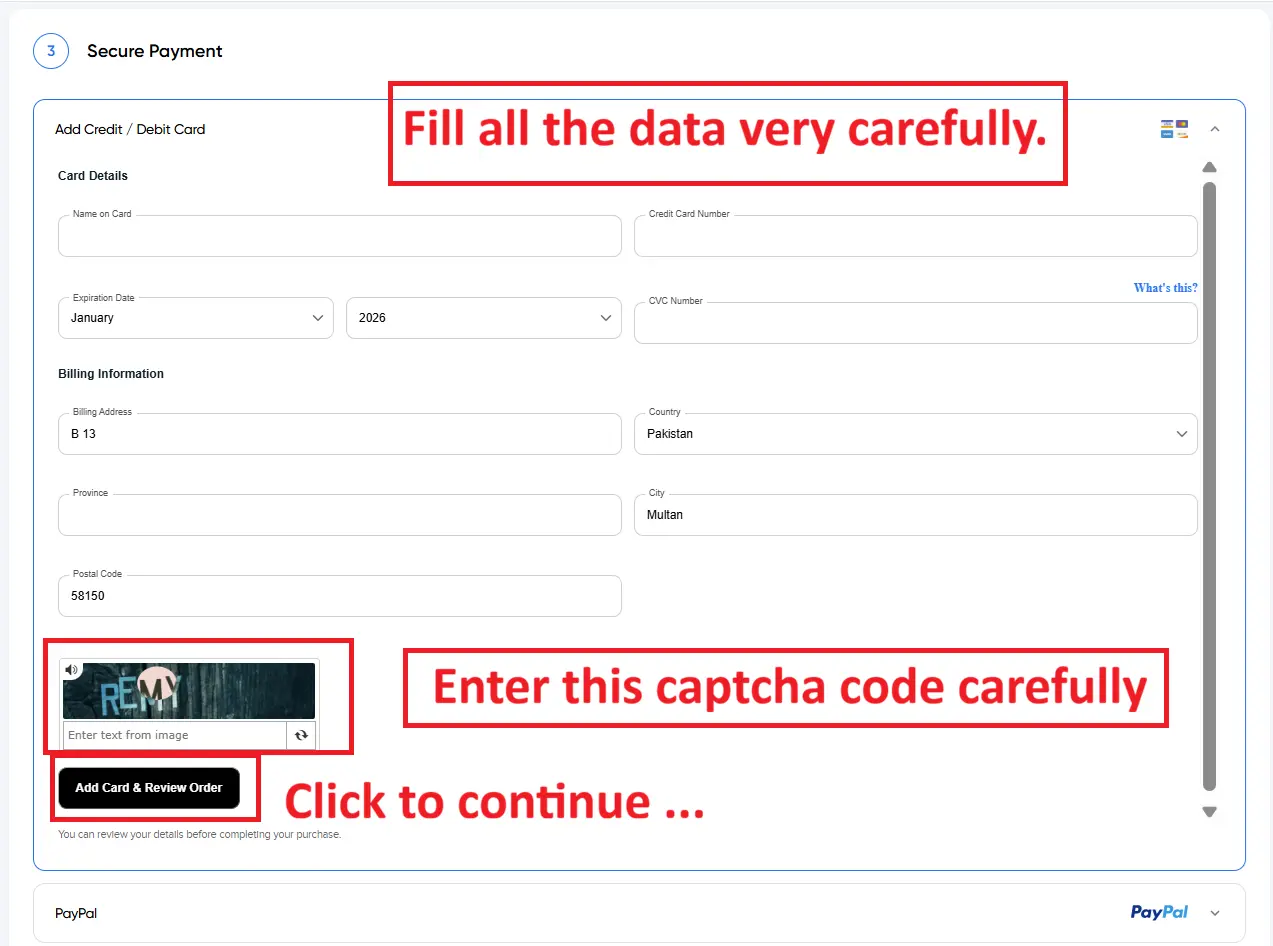
⇒ Now you will click on the “Add Card & Review Order” button as shown in below image.
Step 9: Final Submit Your Order
Your payment details have been saved and visible to you. Now! Just click on “Submit Order” to complete the purchase process as shown in the below image.
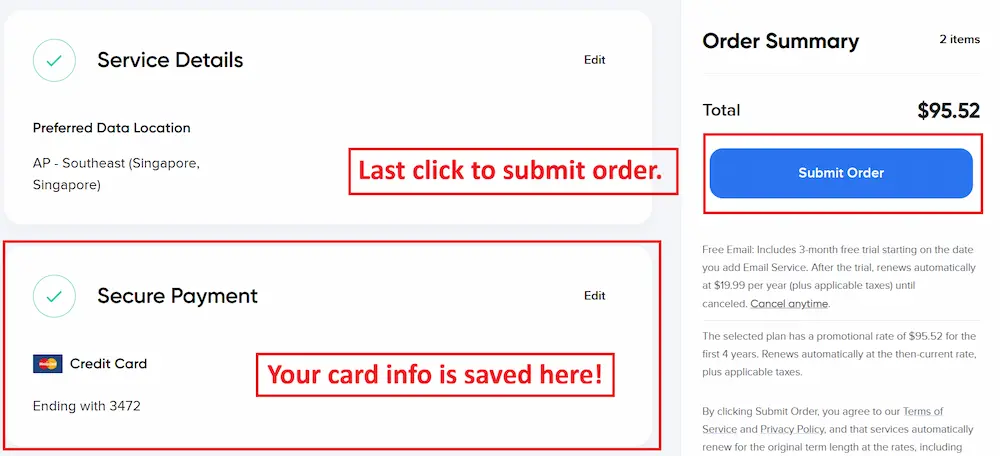
⇒ Congratulations! Everything is done!
Step 10: Free Website & Other Benefits
Great! You have successfully purchased your DreamHost web hosting. Now, it's time to claim your free domain and submit your hosting invoice to us to verify your purchase and unlock your additional benefits.
1. Claim Your Free Domain
Follow these steps to claim your free domain (subject to DreamHost's eligibility and terms):
- Log in to your DreamHost panel.
- Click on "Domain Names."
- Click on "Find New Domains."
- Search for your desired domain name and check whether it is eligible for the free domain offer.
- Follow the on-screen instructions to complete your domain registration.
Once you have successfully registered your free domain, you can proceed with setting up your WordPress website using our Free Website Offer.
2. Submit Your Hosting Invoice for Verification
To verify your hosting purchase and claim your additional affiliate benefits, you need to share your DreamHost hosting invoice with us. Follow these steps to download it:
- Log in to your DreamHost panel.
- Click on "Billing & Account."
- Click on "View Invoices."
- Find your hosting purchase invoice and click on "Download PDF Invoice."
Once you have downloaded the PDF invoice, send it to us via WhatsApp for verification.
📲 WhatsApp: +92 343 786 1234
After verification, you can claim your eligible affiliate benefits. Below, I have explained all the gifts and benefits you will receive from us.
Most Important Step after Hosting Purchase:
After purchasing your hosting from DreamHost, remember that your payment card details may be saved for automatic renewals. This means DreamHost can automatically charge your card when your hosting subscription is due for renewal.
If you don't want automatic payments, contact DreamHost Support and ask them to remove your saved payment method and disable automatic payments.
This simple step can help you avoid unexpected charges and keep your funds under your control. You can then manually renew your hosting whenever you need it, ensuring you stay in charge of your payments.
Benefits to Purchase Hosting from Our Affiliate
We have some special gifts for you when you buy hosting through our affiliate link. These include a free website, our customized LGA theme, premium plugins, and API access to add tools to your site.
Here is what you will get and how each benefit can help you.
- Free Website with Our Customized LGA Theme: We will provide a website with our customized, SEO-friendly LGA theme, giving you a ready starting point so you can focus on adding content and growing your site.
- LGA Internal Linking Pro Plugin: Adding links between related posts can take a lot of time, so we created this plugin to help manage internal linking automatically and make it easier for readers to find more of your content.
- Paid API Access from LGATools.com: We are developing thousands of tools for different niches through our LGATools.com agency, and we will provide API access so you can add useful tools to your website and create more reasons for visitors to return.
- Rank Math Pro Plugin: We will provide Rank Math Pro to help you manage important SEO tasks, such as editing meta titles and descriptions, adding structured data, and checking your content for SEO improvements.
- BerqWP Premium Plugin: We will provide BerqWP to help improve your WordPress website’s loading speed, making it easier for visitors to open your pages and browse your content.
- WP Login Lockdown Premium Plugin: We will provide WP Login Lockdown to help protect your WordPress login page by limiting repeated failed login attempts and making it harder for attackers to keep guessing your password.
- Help Choosing Your Hosting Plan: Tell us about your website idea, budget, and the number of sites you want to run, and we will help you choose a plan that suits your needs.
- WhatsApp Guidance During Purchase: If you get confused at any step, message us on WhatsApp so we can guide you through plan selection, account setup, and checkout.
With these benefits, you get more than hosting. You get access to paid resources like premium themes, plugins, website tools, and much more to help you build and manage your site.
Ready to claim your gifts? After purchasing through our affiliate link, send us your invoice on WhatsApp so we can check your purchase and help you get started.
📲 WhatsApp here: +92 343 786 1234
Common Errors and How to Fix Them
Sometimes, after you click submit, you may see an error message instead of a success page. This happens more often than people think, and it's usually nothing serious. Here's what to do:
- Card Declined: Double-check your card number, expiry date, and CVC. Even one wrong digit causes this error.
- Insufficient Balance: Make sure you have sufficient funds in your card. You must have the actual amount and all applicable taxes.
- Session Timeout: If you took too long filling the form, the page may expire. Just refresh and try again.
- Duplicate Account Error: This means your email was already used before. Go back and use a new email address.
If none of these fix it, try a different card or wait a few minutes and try again. Sometimes the payment gateway just needs a fresh try.
Important Take Cares!
Before you complete your purchase, check these simple points. They will help you understand the costs, protect your account, and receive the benefits included in our offer.
- Use Our Affiliate Link: Start your purchase through our link so your order can be tracked for our affiliate offer.
- Check Your Eligibility: Our affiliate offer depends on a qualifying purchase; if you already use DreamHost, contact us before buying.
- Check the Final Total: Use the amount shown at checkout, as prices, discounts, and taxes can change.
- Understand Upfront Payment: If you choose a yearly or longer plan, you pay for the full selected term upfront.
- Check Renewal Prices: Look at the renewal costs for your hosting, domain, and any extra services before placing your order.
- Remove Unwanted Extras: Review your order and remove optional services you do not need.
- Check Free Trial End Dates: If email or another service is free for a limited time, check when charges begin.
- Check the Free Domain Offer: Confirm which domain names qualify, how long the offer lasts, and what renewal will cost.
- Use Your Own Account Details: Register with your name and an email address you can access so you stay in control of your hosting.
- Check Your Card Settings: Ask your bank whether your card supports international online payments and has a suitable spending limit.
- Keep Enough Balance: Allow for the full order amount, currency conversion, and any bank fees or taxes.
- Protect Your Payment Details: Never share your full card number, CVC, banking password, or OTP on WhatsApp.
- Check Before Paying Again: If an error appears, check your account and confirmation email before making another payment.
- Choose Your Server Location: Select an available location close to most of your website visitors.
- Confirm Your Free Website Details: Ask how many pages, design changes, and setup services are included with the LGA theme.
- Check Plugin Access: Confirm the license period, updates, support, and website limits for the premium plugins in our offer.
- Check LGATools API Limits: Ask which tools are included, how many requests you can make, and how long your access lasts.
- Confirm Gift Delivery: Ask when your website, plugins, and API access will be provided after your purchase is verified.
- Keep Your Invoice: Save your receipt and order number so we can check your purchase and help you claim your benefits.
- Hide Private Invoice Details: Cover your billing address and payment information before sharing your invoice with us.
- Read Refund Terms: Check which charges are refundable and ask how cancellation would affect your affiliate gifts.
About cookies: Clearing cookies is not a required buying step. If you clear them to fix a signup problem, open our affiliate link again before continuing.
Already a DreamHost customer? Using a different email does not make you a new customer. Contact us first to check whether a separate offer is available for you.
Need help with any of these points? Message us before paying so you know what to expect.
Wrap Up
This guide covered everything you need to buy DreamHost hosting, from start to finish. We covered clearing your cookies, picking your plan, making your account, choosing your server location, and entering payment. We also covered common errors and how to fix them fast.
Now you have everything you need to get your hosting live today. Follow these steps in order, and you'll have your website ready to build in just a few minutes.
Good luck with your new website. Goodbye for now, and see you in the next guide!
Some Important FAQs!
Here are some of the most common questions about buying DreamHost hosting. These answers will help you understand payments, affiliate benefits, and what to check before you order.
The amount depends on your final checkout total and your bank’s exchange rate. Your bank may also add fees or taxes. Use this simple calculation:
Required PKR = checkout total × your bank’s exchange rate + applicable fees and taxes.
For example, a $35 order at an assumed rate of Rs. 280 per dollar would cost Rs. 9,800 before extra charges. This is only an example, so ask your bank for the rate that applies to your payment.
First, check which payment options appear at checkout. DreamHost lists credit cards for new accounts and also accepts PayPal for new Web Hosting, DreamPress, and email-only plans.
You can:
- Ask your bank about a suitable card for online international payments.
- Use PayPal if you have a valid account and checkout offers it.
- Ask DreamHost support about your available options before ordering.
Do not send money to an unknown person who promises to purchase hosting for you.
Contact us as soon as you notice the issue. Send the details we need to check your purchase:
- Your order or invoice number.
- Your purchase date.
- Your selected hosting plan.
- A screenshot with private details hidden.
DreamHost requires missing referrals to be reported within 14 days, and approval is at its discretion. We cannot promise that an untracked order will be accepted.
DreamHost’s referral offer is for new and unique customers. Using a new email does not automatically make you eligible. Contact us before buying to ask whether we have a separate offer for existing users.
Please message us on WhatsApp to ask about our current offers. We will confirm whether another hosting offer is available. Check its price, features, and gift details before choosing.
An affiliate link does not automatically guarantee the lowest price. Check the final offer before paying. Compare these details:
- The total amount due today.
- The length of the plan.
- The renewal price.
- Any paid extras.
Choose based on the full cost and what you need.
You will get these gifts with your qualifying purchase:
- Free blogging website with the LGA theme.
- LGA Tools access.
- LGA Internal Linking Pro.
- Rank Math Pro.
- BerqWP Premium.
- WP Login Lockdown Premium.
- Access to more premium themes, plugins, and tools.
And much more ...
No. The current Web Hosting plans advertise a free domain for one year. You will need to pay to renew it after the free period. Check the domain’s renewal price before choosing your website name.
DreamHost currently lists a 30-day refund window for new Web Hosting plans, subject to its terms. Other products may have different rules. Domain registrations are non-refundable, so do not assume your whole order will be refunded. Contact DreamHost support to confirm your eligible amount and cancellation steps.
Singapore is a reasonable option to consider for an audience mainly in Pakistan. DreamHost currently lists data centers in Singapore, Amsterdam, and two US locations. Distance can affect loading time, but your website’s design and content also matter. Choose from the locations available for your plan.
Start by checking your payment details. Then work through these simple steps:
- Check the card number, expiry date, and security code.
- Make sure your billing details match your bank records.
- Check your balance and spending limit.
- Ask your bank whether it blocked the payment.
- Look for an order confirmation before trying again.
If money has been deducted but no order appears, contact DreamHost and your bank before paying again.
Buying hosting gives you the space for your website. You still need to connect a domain and build or upload the site. If you are claiming our free website gift, its delivery follows the timeline agreed with us. Keep your confirmation email so you can access your account and follow the next steps.

- ✔ Be Respectful
- ✔ Stay Relevant
- ✔ Stay Positive
- ✔ True Feedback
- ✔ Encourage Discussion
- ❌ Avoid Spamming
- ❌ No Fake News
- ❌ Don't Copy-Paste
- ❌ No Personal Attacks